In Depth Walkthrough
Pull
The Pull stage ingests entities from your organization’s knowledge graph into Expert Center, making them available for enrichment and classification.
Pull is the foundation that discovers available buildings and their connectors, and connectors and their entities. Review a (growing) list of Mapped's available connectors and check out Connector Guides in this documentation.
Understanding Source Entities
Source Entities are entities that exist in your building’s data sources. When you pull data into Expert Center, you’re importing raw Source Entities from various connectors like BMS points (e.g., AHU-01_SAT, VAV1.ZNT), IoT sensor readings, or equipment names from integration platforms. These Source Entities form the foundation for all enrichment work in Expert Center.
When to Pull
You should Pull in Expert Center when starting a new building onboarding, refreshing data after ingesting new entities and relationships, adding new connectors to an existing building, or troubleshooting missing or outdated data
How to Pull
From Organization Level

- Navigate to Expert Center’s organization page
- If the buildings list is empty, click the PULL button
- Wait for the operation to complete (typically 1-3 minutes)
- Buildings will appear in the table once pulled
From Building Level

- Select a building from the organization view
- If the connectors list is empty, click the PULL button
- New or updated connectors will appear in the Connectors table
Troubleshooting
No buildings: Contact [email protected] if this issue persists.
Missing connectors: Run Pull again to refresh, then verify that the connector exists in your organization's console and that the connector source has data.
Completion Indicators
You'll know the Pull is complete when:
- ✓ Buildings appear in the Buildings table
- ✓ Connectors are visible within each building
- ✓ Entity counts are displayed for each connector
⚠️ Warning signs:
- If the Buildings table is empty after Pull, check your permissions or contact [email protected].
- If expected connectors are missing from the Building overview, re-run Pull or check that the connector is linked to this Building in your organization's console.
Label
Once Pull is complete and you’ve selected a connector, begin the classification process with the Label stage.
The Label stage is where domain experts classify and enrich a sample of entities, creating the foundation for training AI models. Labeling captures domain expertise in a scalable format and builds a localized training dataset for inference.
Understanding Labeled and Derived Entities
During labeling, you’ll work with and create two types of entities:
Labeled Entities are Source Entities that you manually classify. When you label AHU-01_SAT as a "Supply Air Temperature Sensor," you’re creating a Labeled Entity with your domain expertise.
Derived Entities are new entities that don’t exist in the original data but are implied by Source Entity patterns. Each Derived Entity is always associated with one or more Source Entities that reference it. For example, when labeling VAV1.ZNT, you identify that:
- The Source Entity is a BACnet point
- It implies the existence of “VAV1” (a Variable Air Volume box)
- Expert Center creates “VAV1” as a Derived Entity linked to the Source Entity VAV1.ZNT
The Labeling Workflow
1. Inspect the Queue
Navigation: Connector Overview → Click Queued in Labeling Progress bar
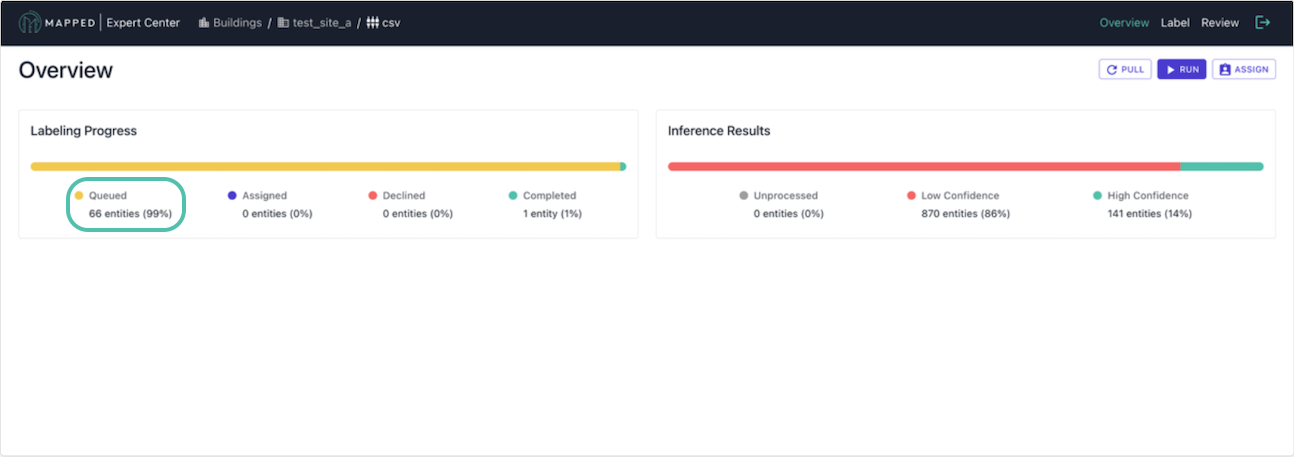
Before labeling begins, familiarize yourself with the data in the queue and identify common naming patterns so you can prioritize high-value patterns based on your needs.
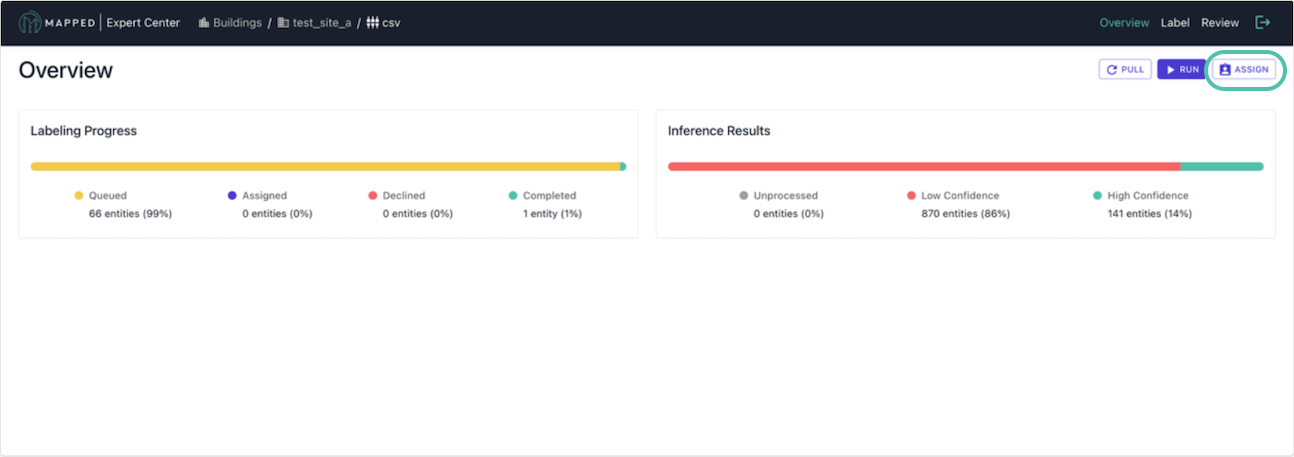
2. Assign Work
To distribute labeling tasks to your team, click Assign from any connector view.
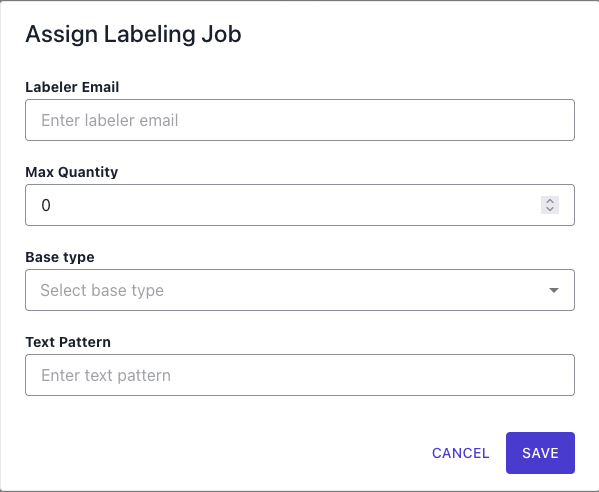
When assigning work, you specify:
- Labeler’s email: Team member responsible
- Max quantity: Number of entities to assign
- Base type: Point, Thing, Collection, Place
- Text pattern (optional): Filter by naming patterns
3. Label Entities
Each Labeled Entity requires completing 3 steps:
- Classification: Assign the correct type to the entity
- Derived Entities: Create new entities implied by this one
- Derived Relations: Define relationships between the source entity itself (SELF) and the derived entities
As an example, let's start with source entity: VAV1.ZNT (Point)
Classification: Classify source entity as Zone_Air_Temperature_Sensor
Add Derived Entities: Create new Derived Entity "VAV1" (and classify as Variable_Air_Volume_Box)
Add Derived Relations:
- Create relationship VAV1 hasPoint SELF
- "VAV1.ZNT (SELF) is a point of VAV1 (derived entity)"
Key Concept: SELF always refers to the current source entity being labeled. Derived relations connect SELF to any entities you created in the Derived Entities step.
Assignment Strategies
By Complexity
One strategy is to start with labeling the entities that you know you need, then progress to ambiguous ones:
- Well-named entities that you need
- Abbreviated names with context
- Ambiguous or poorly named entities
By Team Expertise
It's best practice to match assignment to your team members' strengths:
- Assign HVAC experts to air handling systems
- Assign controls specialists to sensors and setpoints
- Assign local specialists to spatial relationships
Progress Tracking
You can monitor labeling through the Labeling Progress bar. Entities will change from Queued to Assigned to Completed.
![]()
Common Labeling Challenges
Missing Metadata
If there's missing metadata, you have the option to label conservatively with limited information or consider deferring until more data is available.
Completion Indicators
You'll know labeling is complete when all assigned entities are marked Completed.
⚠️Warning signs:
- If there's a large amount of Assigned entities, check with the assigned labelers on your team.
- If there are too few labeled examples, assign more entities before proceeding to process.
Process
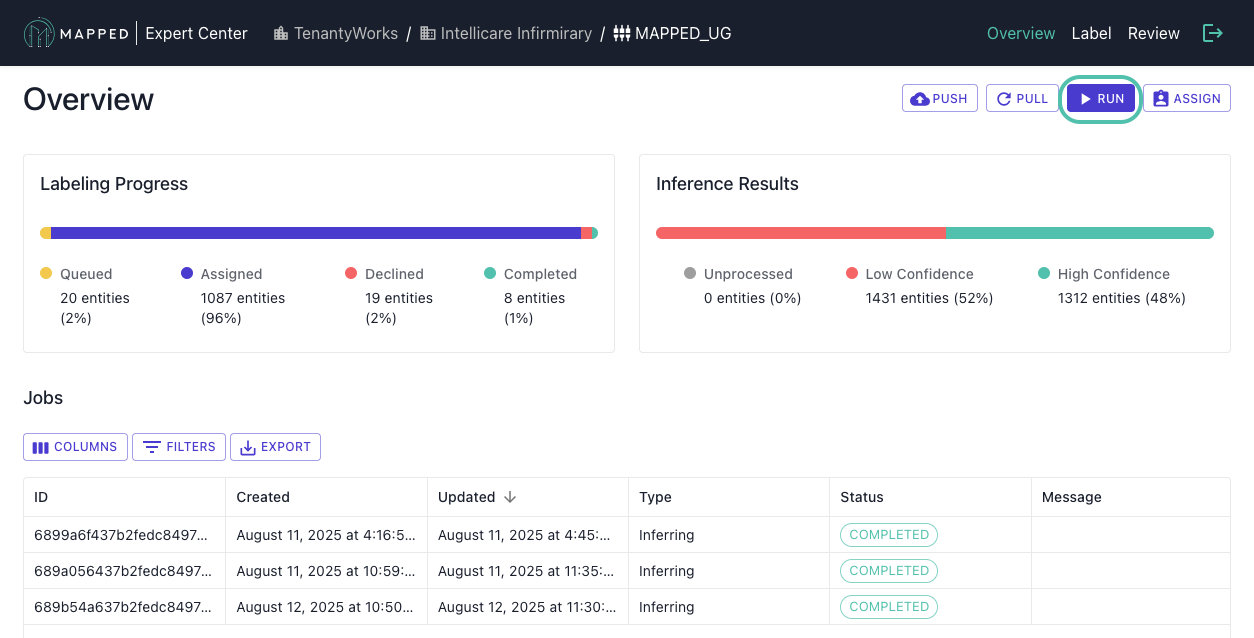
Once assigned entities are completed, proceed to the the Process stage, which leverages AI models trained on your labeled data to automatically classify the remaining entities in your building.
- Train: AI models use provided Labeled Entities
- Infer: Labeling is automated for the rest of the connector's data with predictions
- Results: Finally, Expert Center generates confidence scores for each prediction
Understanding Inferred Entities
Inferred Entities are Source Entities that have been automatically classified by the AI model. The model learns from Labeled Entities to predict:
- Type classifications for Source Entities
- Associated Derived Entities
- Relationships between Source Entity (aka SELF) and specified Derived Entities
For example, if you labeled AHU-01_SAT as a "Supply Air Temperature Sensor," the model can infer that AHU-02_SAT is likely also a "Supply Air Temperature Sensor" and belongs to "AHU-02."
Each Inferred Entity receives a confidence score indicating the model's certainty in its prediction.
Prerequisites
Before you begin processing, ensure that the examples your team labeled cover major equipment types and that initial assignments have been completed.
How to Run
- Navigate to Connector Overview
- Click Run
- Monitor inference progress in the Jobs table (from Connector Overview)
Expected duration: 30-90 minutes depending on volume
Understanding the Process
What Happens During Inference
- Pattern Recognition: Identifies naming conventions and relationships to infer entities
- Enrichment: Applies learned patterns to unlabeled entities to classify, derive entities, and derive relations
- Confidence Scoring: Assigns certainty levels to predictions
Monitoring Progress
Jobs Table
While you monitor inference, you can view the status:
- Running: Currently in progress
- Completed: Successfully finished
- Failed: Error occurred
Inference Results
Once complete, results include Confidence Levels.
- High Confidence (>95%): High certainty for specific Inferred Entity
- Medium Confidence (>80%): Moderate certainty for this Inferred Entity
- Low Confidence (<80%): Inferred Entity most likely requires oversight/correction by domain expert
Optimizing Inference Quality
Multiple Iterations
Don't expect perfection on the first run. Instead, run initial inferences, then review results and any labeling gaps. After labeling entities in the queue, you should re-run for improved accuracy.
Troubleshooting
Poor Accuracy
To address poor accuracy, label more entities in the queue. The inference process already adds low confidence output to the queue. Then, review labeling consistency and check for naming pattern variations.
Long Processing Times
For large connectors with more than 10,000 entities, it's normal if processing times may exceed the expected 30-90 minutes. You can check system status for delays.
Interpreting Results
- Progress: Percentage of High Confident Inferred Entities
Completion Indicators
You'll know Processing is complete when:
- ✓ Inference Job shows Completed status
- ✓ Inference Results bar appears in Connector Overview
- ✓ Inference Results bar shows distribution across confidence levels
⚠️Warning signs:
- If the job status shows Failed, check any error messages and retry
- If there's a very low percentage of high confidence results, you should label more examples.
- If a job is running more than 3 hours, check system status or contact [email protected].
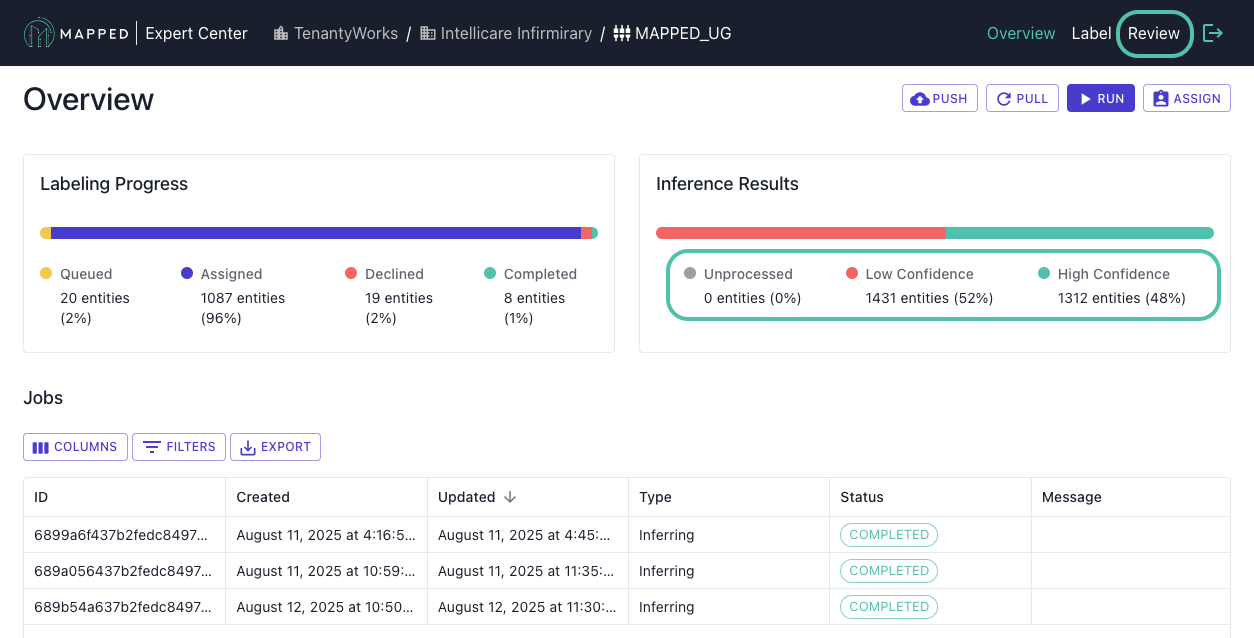
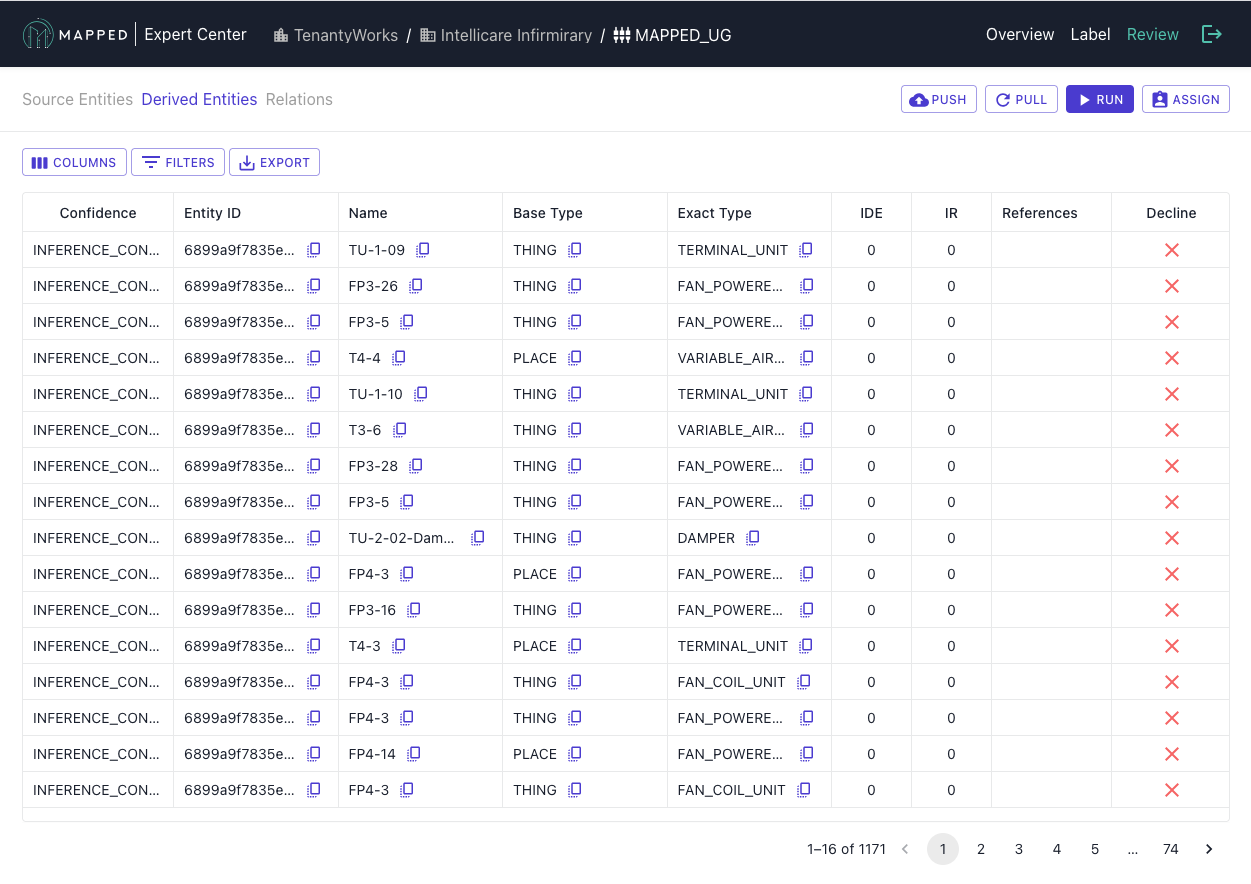
Review
With inference complete, you can move onto the Review stage, which validates AI predictions through targeted human oversight, ensuring quality before proceeding. Review validates model predictions across confidence levels and identifies patterns requiring additional labeling, evaluating whether Labeled Entities match training data.
Interface Navigation
From Connector Overview:
To navigate to the Review tab, you can click confidence level bars in Inference Results for filtered views or select Review from the header menu for a complete overview.
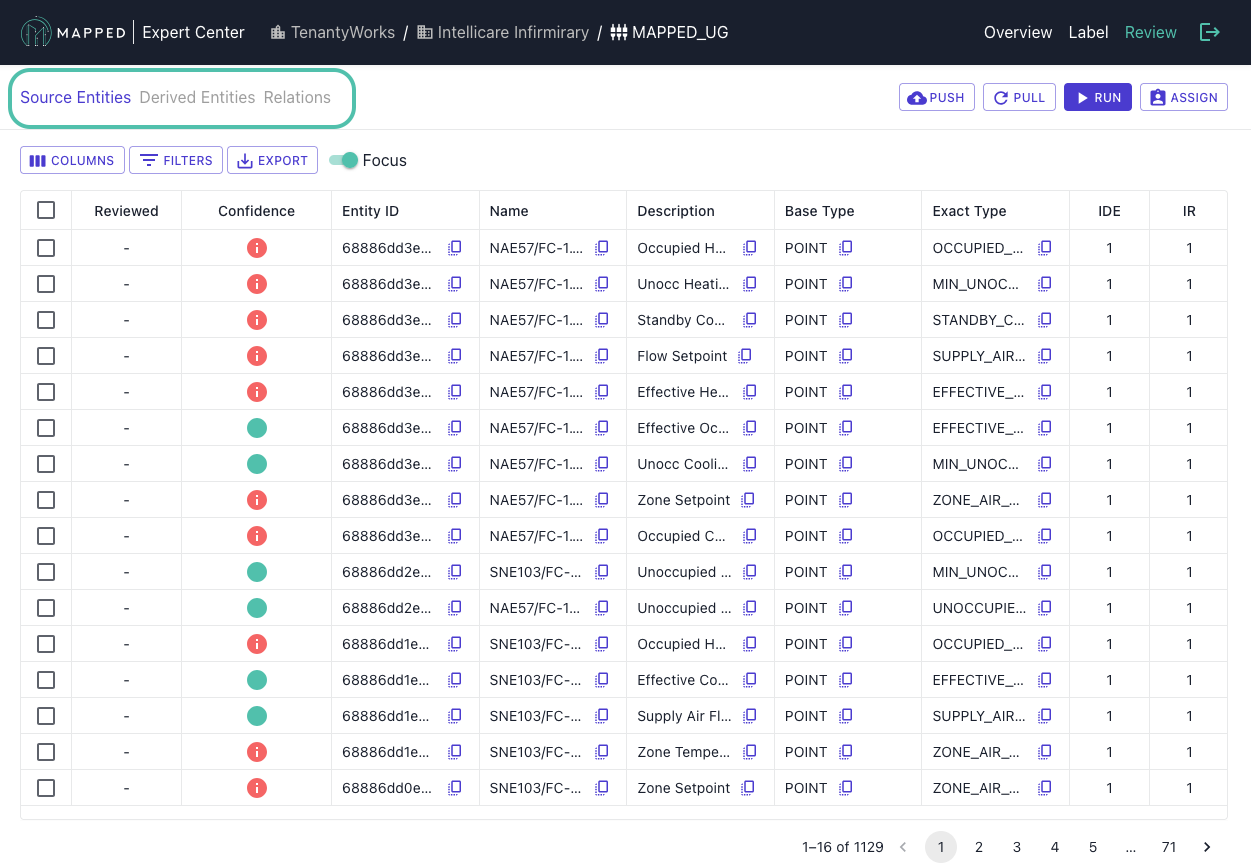
Review Tabs:
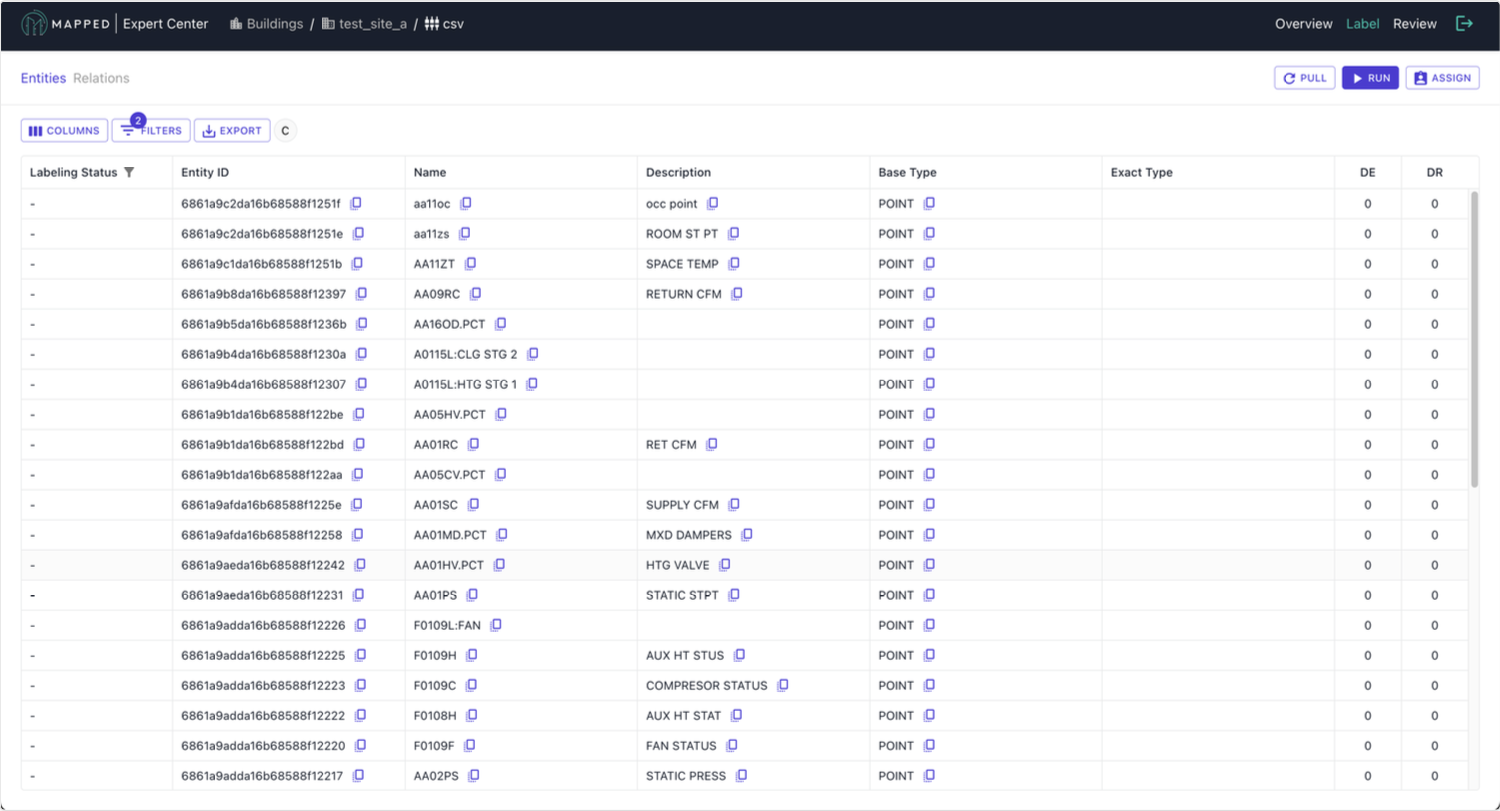
Once on the Review Tab, you can drill down further into entities and relations through the tabs on the left:
- Source Entities: Original entities with AI classification and enrichment
- Derived Entities: New entities inferred from Source Entity metadata
- Derived Relations: New relationships between entities from Source Entity metadata
Review Strategy
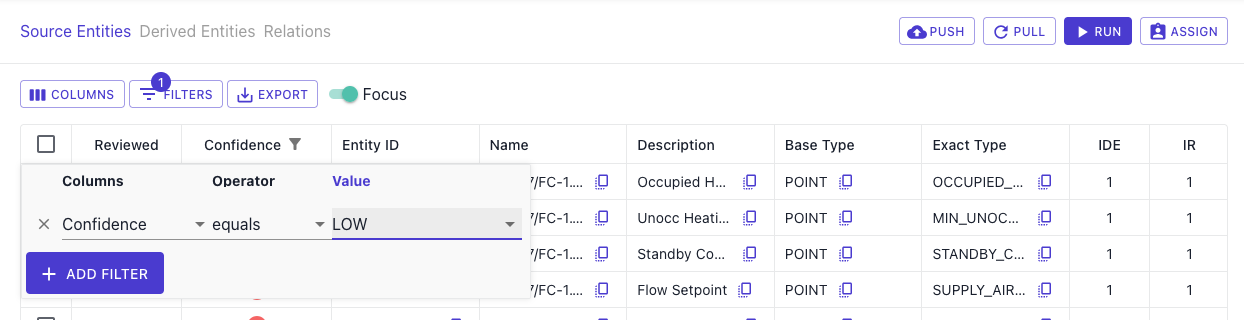
Start with Low Confidence (<80%)
These predictions indicate model uncertainty and guide future labeling priorities. To begin, filter by Low Confidence on the Review tab or select Low Confidence from the Inference Results bar in the Connector Overview.
You can approve any obvious correct predictions and take note of patterns for the next labeling round. Declined patterns are automatically added to the Labeling Queue.
2. Spot-Check High Confidence (>80%)
Even high-confidence predictions can contain errors from training data issues. To begin, filter by High Confidence on the Review tab or select High Confidence from the Inference Results bar in the Connector Overview.
Here you can sample high confidence results and decline any incorrect classifications. Any declined entities are automatically returned to the Labeling Queue.
3. Validate Derived Entities
To review Derived Entities, switch to Derived Entities tab.
If you find an incorrect classification, you can decline an entire Derived Entity row. Note that declining affects all source entities using that derived entity.
Review Actions
| Action | Source Entities | Derived Entities |
|---|---|---|
| Approve ✓ | Confirms classification | Not Applicable |
| Decline ✗ | Returns to labeling queue | Rejects all dependent entities |
| Skip → | Applies automatic rules* | Not applicable |
*Automatic rules: Low confidence inferences are declined, while high confidence inferences are approved.
Consider re-running inference if quality targets aren't met, or new labeling patterns are identified.
Completion Indicators
You'll know Review is complete when:
- ✓ High confidence Source Entities reviewed
- ✓ Derived Entities have been reviewed
- ✓ No entities have needed to be updated since last inference
⚠️ Warning signs:
- If there's a high percentage of low confidence results, return to labeling more examples.
- If there are systematic errors in high confidence results, check labeling consistency.
- If there are declined derived entities, review the labeling approach for derived entities.
Unify
After review, the Unify stage creates a single source of truth by merging duplicate entities across different connectors (data sources). Unification eliminates duplicate representations of the same physical entity and creates unified entity relationships.
Why Unification Matters
The same equipment (AHU1) can appear as AHU01.SupplyTemp from a BMS source, Air Handler 1 Supply Temperature from a spreadsheet, or SITE1/AHU/01/SAT from a connector integration. Unification allows you to merge all three entities as one entity:
- AHU01 -> AHU1
- Air Handler 1 -> AHU1
- AHU/01 -> AHU1
Pre-Unification Checklist
Before starting unification, ensure that:
- ✓ All connectors have been processed through inference
- ✓ Classification and enrichment have been reviewed and approved
Step 1: Access Unification
Navigate to Building Overview, then select Unification from the header menu on the top right.

Then, review the Unification interface.
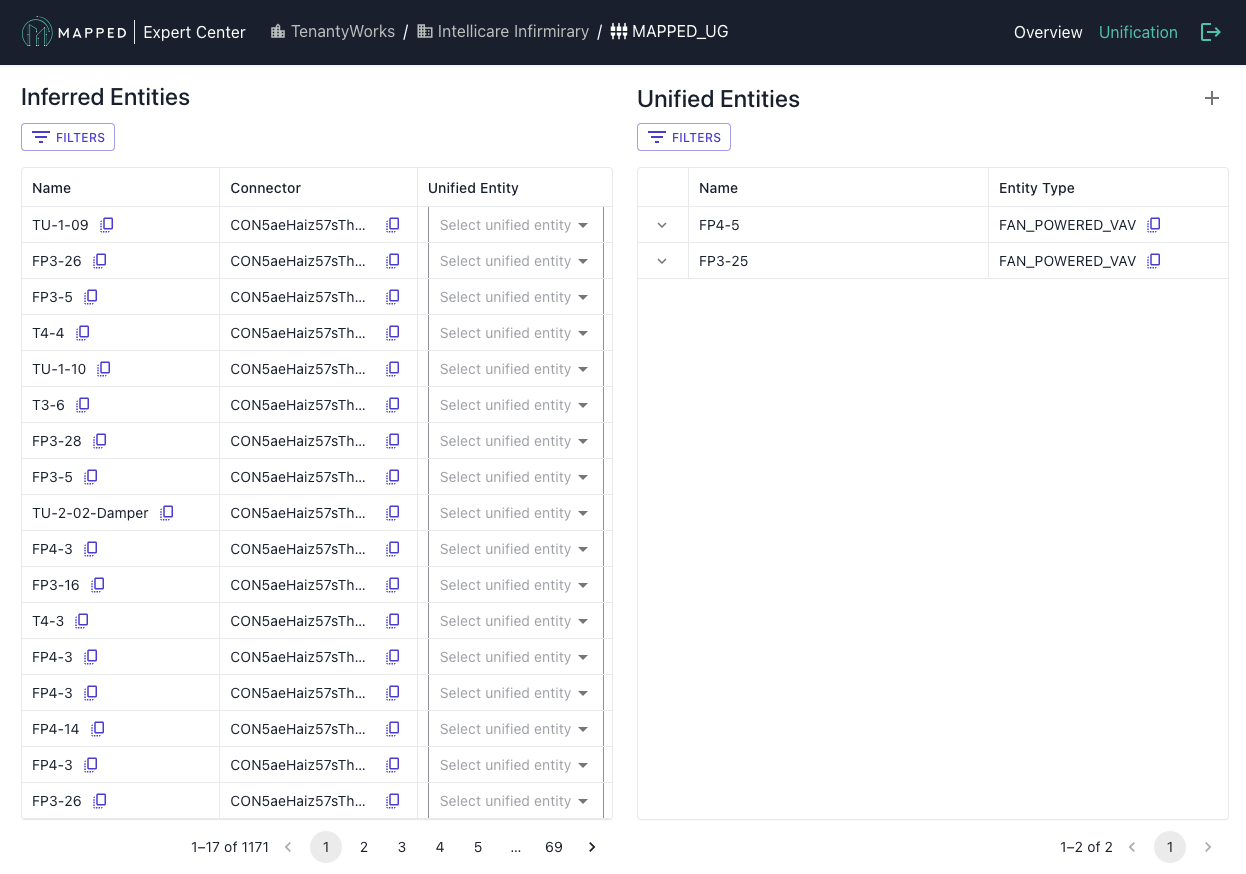
Step 2: Manual Unification
Create Unified Entities:
- Create a new Unified Entity by clicking the + symbol in the upper right
- Assign Source Entities from different connectors to this Unified Entity
- Repeat for all entities requiring unification
Modify Existing:
- Add additional entities to existing unified groups
- Remove incorrectly grouped entities
Tips for Identifying Duplicates:
- Look for similar names across connectors (AHU01, AHU1, Air Handler 1)
- Match by equipment type
- Check for identical or similar names
Common Mistakes
Over-unification may occur if you merge similar but distinct entities. For example, merging multiple zones into one zone.
Completion Indicators
You'll know the Unify step is complete when:
- ✓ All duplicate entities across connectors have been unified
- ✓ Major equipment appears only once in unified view
- ✓ Cross-connector relationships are established
- ✓ No obvious duplicates remain unmerged
⚠️ Warning signs:
- If equipment counts seem to low, check for over-unification.
- If expected equipment is missing, review connectors for unmapped entities.
- If there are unified entities with conflicting types, review and correct unification.
Push
With unified knowledge graph complete, it's time to export enriched data back to operational systems. The Push step updates the organization’s knowledge graph with all the enrichment and unification work performed in Expert Center.
What Gets Pushed
Enriched Data Includes
Classifications
- Standardized type classification
Derived Entities
- New entities derived from source data
Derived Relationships
- Equipment hierarchies (hasPart)
- System connections (feeds)
- Spatial associations (hasLocation)
Unified Representations
- Single source of truth for building’s physical systems
- Cross-connector entity links
- Deduplicated entities
Push Destination
All enriched data is pushed back to the organization’s central knowledge graph, making it available for analytics and reporting as well as integration with other systems.
Executing Push
Pre-Push Validation
Before pushing, verify that all connectors have been reviewed and unification has been finalized. You can always make changes and push again.
Push Process
To push, navigate to the Building Overview and select Push All from the actions menu in the upper right.

Monitor push progress, which typically takes 1-5 minutes. Then, verify successful completion.
Post-Push
After a successful push, enriched data is immediately available in the organization's knowledge graph for:
- GraphQL API access: Query building data (GraphQL Documentation)
- Console interface: View and analyze building data in the Mapped Console
Completion Indicators
You'll know the Push step is complete when:
- ✓ Push status shows Completed in the Jobs table
- ✓ No error messages are displayed
- ✓ Building shows the last push timestamp
- ✓ Enriched data appears in the organization’s knowledge graph
⚠️ Warning signs:
- If the Push status shows as Failed, check for any error messages and retry.
- If the Push step takes more than 10 minutes, contact [email protected]
Validate
After completing the push process, it’s important to Validate that your enriched knowledge graph is an accurate depiction of the building, and that it meets your expectations. This guide provides GraphQL queries to verify different aspects of your pushed data.
Use these queries to validate entity classifications, derived entities and relationships, and unified entity mappings.
Prerequisites
- Complete the Push step from Expert Center
- Access to an Organization's Console and GraphiQL Explorer. Contact [email protected] if you need assistance with access.
- Building ID from your organization, which you can copy from the Organization Overview
Validation Queries
Replace YOUR_BUILDING_ID with your actual building ID in all queries below.
1. Validate Spaces and Floor Structure
Verify that building spaces and floors are properly structured:
Copy1 2 3 4 5 6 7 8 9 10 11 12 13 14 15 16 17 18 19 20 21 22 23{ buildings(filter: {id: {eq: "YOUR_BUILDING_ID"}}) { id name floors { id name spaces { id name description exactType } } spaces { id name description exactType mappingKey } } }
2. Validate Equipment and Relationships
Check that Things (equipment) are properly classified and connected:
Copy1 2 3 4 5 6 7 8 9 10 11 12 13 14 15 16 17 18 19 20 21 22 23 24 25 26 27 28 29 30 31 32 33 34 35 36 37 38 39 40 41 42 43 44 45 46 47 48 49 50 51 52 53 54{ buildings(filter: {id: {eq: "YOUR_BUILDING_ID"}}) { things { id name description exactType mappingKey hasLocation { id name exactType } hasPart { ... on Thing { id name exactType } } isPartOf { ... on Thing { id name exactType } } feeds { ... on Thing { id name exactType } ... on Space { id name exactType } ... on Zone { id name exactType } } isFedBy { ... on Thing { id name exactType } } } } }
3. Validate Collections
Check collection and/or system composition:
Copy1 2 3 4 5 6 7 8 9 10 11 12 13 14 15 16 17 18{ buildings(filter: {id: {eq: "YOUR_BUILDING_ID"}}) { collections { id name description exactType mappingKey hasPart { ... on Thing { id name exactType } } } } }
4. Check Zones and HVAC Relationships
Validate zones and their HVAC system connections:
Copy1 2 3 4 5 6 7 8 9 10 11 12 13 14 15 16 17 18 19 20 21 22 23 24 25 26 27 28 29 30 31 32 33 34{ buildings(filter: {id: {eq: "YOUR_BUILDING_ID"}}) { zones { id name description exactType isServedBy { id name exactType } isFedBy { ... on Thing { id name exactType } } hasPart { ... on Space { id name exactType } ... on Zone { id name exactType } } } } }
5. Validate Points
Check that sensor points are properly classified and connected:
Copy1 2 3 4 5 6 7 8 9 10 11 12 13 14 15 16 17 18 19 20 21 22 23 24{ buildings(filter: {id: {eq: "YOUR_BUILDING_ID"}}) { points { id name description exactType unit { name description } isPointOf { ... on Zone { id name } ... on Thing { id name } } } } }
*** 6. Check Point Data and Latest Values ***
Verify that points have recent data:
Copy1 2 3 4 5 6 7 8 9 10 11 12 13 14 15{ buildings(filter: {id: {eq: "YOUR_BUILDING_ID"}}) { points { id name exactType series(latest: true) { timestamp value { float64Value } } } } }
Validation Checklist
After running these queries, verify the following:
- ✓Spaces and floors are properly structured
- ✓ Equipment (Things) have appropriate classifications
- ✓ Equipment relationships (feeds, isFedBy) reflect system connections
- ✓ Collections group related equipment appropriately
- ✓ Points are classified and connected to parent equipment/zones
- ✓ Recent data is available for active points
Completion
Congratulations! You’ve completed the Expert Center enrichment process. Your building now has a validated, unified knowledge graph ready to power advanced analytics and operations.
Next Steps
Once you’ve validated your knowledge graph data, you can integrate with downstream systems via GraphQL API and monitor data quality and update as needed. For ongoing data management, return to Expert Center to make updates and push changes as required.