CSV Connector
The CSV Source Connector allows you to take exports from your building systems and import them into your Mapped graph via CSV file. The Connector's configuration wizard will guide you step by step, from selecting and uploading your file, to mapping the data to the correct Site, to aligning the rows in the CSV with the fields in the Mapped graph.
Schema
The schema for the CSV Connector is as follows:
Building
- buildingAddress
- buildingRefId (optional)
- buildingName (optional)
- latitude/longitude (optional, but required if address validation is disabled)
- Address must be validated
Floor (optional)
- floorRefId (optional)
- floorLevel (required if Floor is included)
- floorName (required if Floor is included)
Space (optional)
- spaceRefId (optional)
- spaceName (required if Space is included)
- spaceCode (required if Space is included, must be unique per spaceRefId)
- Must relate to a Floor
Zone (optional)
- zoneRefId (required if Zone is included)
- zoneName (optional)
- zoneExactType (optional, defaults to ZONE)
- Must be associated with a Building, Floor or Space
Thing (optional)
- thingRefId (required if Thing is included)
- thingName (required if Thing is included)
- Must be located based on Building, Floor or Space
- If a Zone is present, the Thing serves that Zone
Point (optional)
- pointRefId (required if Point is included)
- pointName (strongly recommended)
- pointUnit (optional)
- pointExactType (optional, defaults to POINT)
- pointValue (required if pointTimeStamp is included, must be numeric int or float)
- pointTimeStamp (required if pointValue is included)
- Must be associated with a Thing, Zone, Space, Floor, or Building
Business Rules
There are a number of rules that control the process of importing data via a CSV file:
Address Validation
Building address is always required, so the connector can either map to an existing building or create a new one. The building address is validated by an address validation service that automatically finds the latitude and longitude based on the address. If the address validation cannot find a longitude and latitude with the provided address, the import may fail at this step or automatically change the address to a valid one.
⚠️ If a connector contributes a new address for an existing Building, this will create a duplicate. ⚠️
Address validation may be disabled under the Advanced Config tab, but in that case latitude and longitude values must be provided.
RefIds
- If you don't have a building ID mapped to the buildingRefId field, one will be automatically populated based on the unique building address.
- If an item (such as a Space, Thing, or Point) is included, then an associated refId is also required.
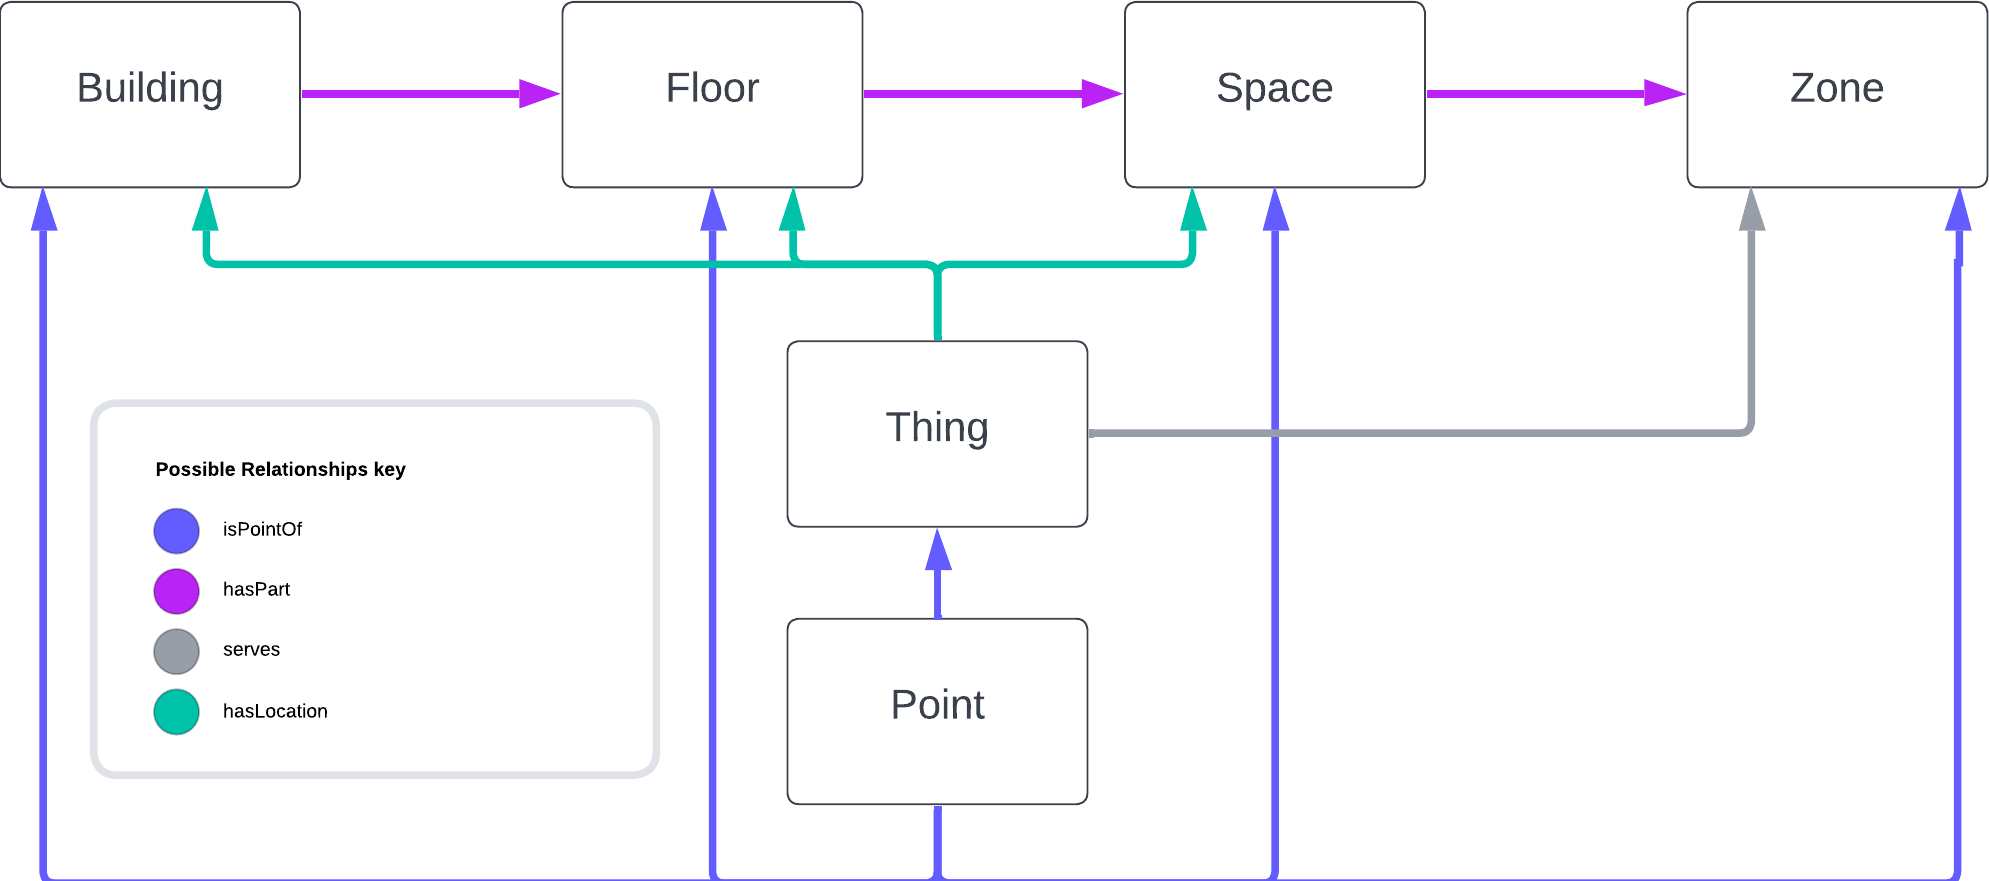
Hierarchy
The data follows a hierarchy of requirements: Point requires a Thing, Thing requires a Space or a Floor, Space requires a Floor.
Values
- A Point requires both a Point Value and a Point Timestamp, if it has either.
- Floor Level and Point Value must be a valid number; we do not currently support other types for Point Values.
Other Considerations
- Larger datasets may be cumbersome for the connector - if your CSV contains over 500 unique devices, consider breaking it up into multiple import files.
- After you submit your CSV, our system will import the data in the background. You are free to return to the Mapped Console after submission, and can see the data populate via the Explorer Grid View.
- ⚠️ Automatic address validation may edit the building address from what you have entered it in the CSV. In order to avoid changing the building's address from what is entered in your file, disable address validation in the Advanced Config tab by setting Disable Address Validation to true and saving. ⚠️
Config
Site Options
On the Site Options tab, select the Site to which you wish to add this data and Save.
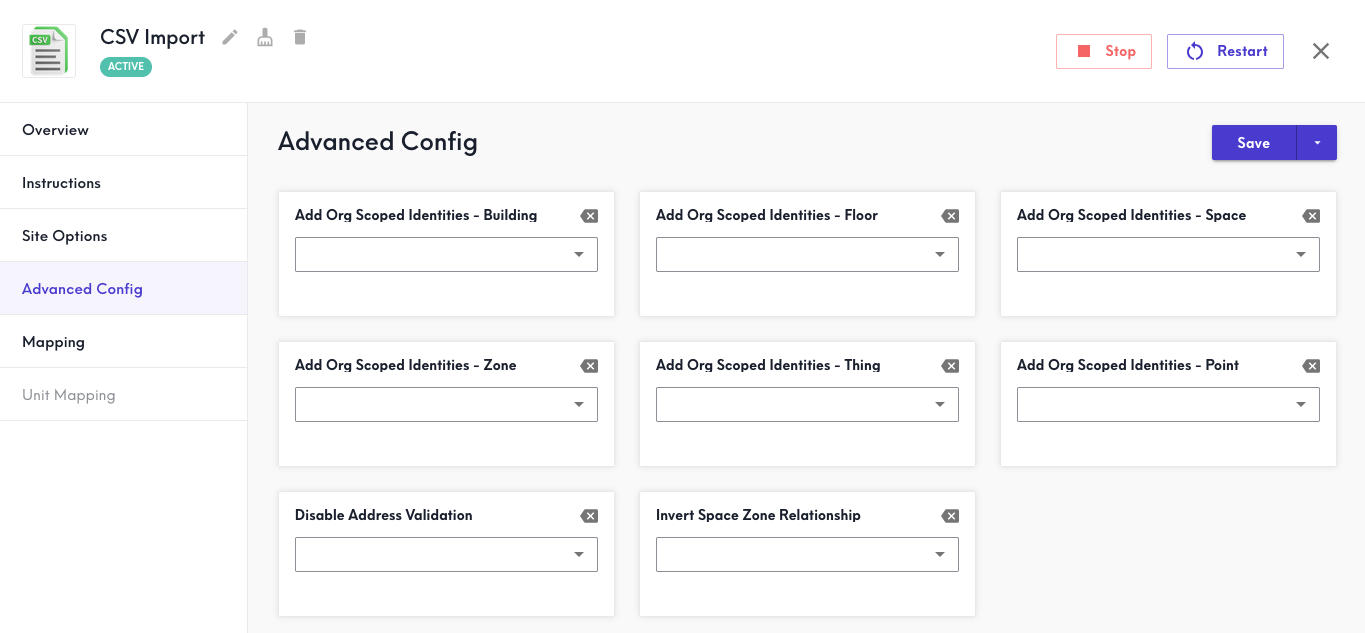
Advanced Config
The Advanced Config tab lets you enable or disable several default options on the CSV connector.
- Add Org Scoped Identities - Building
- Add Org Scoped Identities - Floor
- Add Org Scoped Identities - Space
- Add Org Scoped Identities - Zone
- Add Org Scoped Identities - Thing
- Add Org Scoped Identities - Point
- Disable Address Validation: If set to true, the automatic address validation is disabled, and latitude and longitude will be required. Setting this option to true will prevent automatic address validation from making any changes to the address value.
- Invert Space Zone Relationship
Select Save after you have made any changes.
Mapping
In the Mapping tab, upload your CSV or XLSX file to the CSV importer wizard. If there are multiple sheets in your XLSX file, you will be prompted to select the name of the sheet you wish you upload and Continue. Next, the wizard will allow you to change or confirm the headers of your file then Continue.
Then, the next step will let you change or confirm how the columns in your file fit the wizard template. Hover over each line to preview your data and select Continue. Next, you can review and finalize the data before selecting to Import. At this point, automatic address validation occurs if not disabled.
Finally, you can review the record(s) imported and select Submit to save. At any point before selecting Submit, you may navigate away and then select Start Over when you return in order to cancel the import and submission.